
Buy a new-build home in Calgary, and you’ll probably want to hang a TV, shelves, or maybe some art. But before you reach for that drill, there’s a moment of hesitation. Everyone’s heard the horror stories: those wild tales of hit pipes, mysterious cracks, and wires from nowhere. Drilling into new build walls feels a bit like defusing a bomb—one wrong move, and you’re phoning for an emergency plumber. Yet, we all want the perfect home setup now, not in five years. So, can you safely drill into new build walls? And what should you absolutely avoid?
Understanding Your New Build Walls: What Are You Drilling Into?
New homes in Canada—especially in Calgary—don’t always use the same building materials your grandparents’ homes did. Most commonly, you’ll find drywall (also called gypsum board or sheetrock) mounted over 2x4 or 2x6 wooden studs. Exterior walls often have insulation, vapor barriers, and sometimes a layer of oriented strand board (OSB) behind the drywall. In a few condos, you might also run into concrete or steel stud walls. The drive towards energy efficiency means more layers and different materials than before. But here’s something a lot of folks don’t realize: modern drywall is often about a half-inch thick. That doesn’t give much bite for screws or anchors unless you find a stud.
Statistically, newer builds have more electrical and plumbing lines traveling through their walls. Data from a 2022 Canadian Construction Association review shows that new homes average 20% more internal wiring than homes built even twenty years ago. That means more hidden risks. While most builders strictly follow codes about running wires horizontally at least five feet off the floor and pipes vertically near tubs, not every contractor does things by the book. Some shortcuts end up where you least expect them—think patch jobs behind baseboards or shallow buried pipes behind vanities. The message? Don’t assume any patch of drywall is completely empty behind it.
Pay attention to the types of studs, too. Wooden studs are forgiving—a slightly misplaced hole isn’t a disaster. But steel studs, which often show up in condos, require special drill bits and self-tapping screws. Use the wrong approach, and your screws will spin endlessly or snap in place. Highly insulated or soundproofed internal walls may have double drywall layers, making drilling a bit more awkward, but offering a touch more holding power for your anchors.
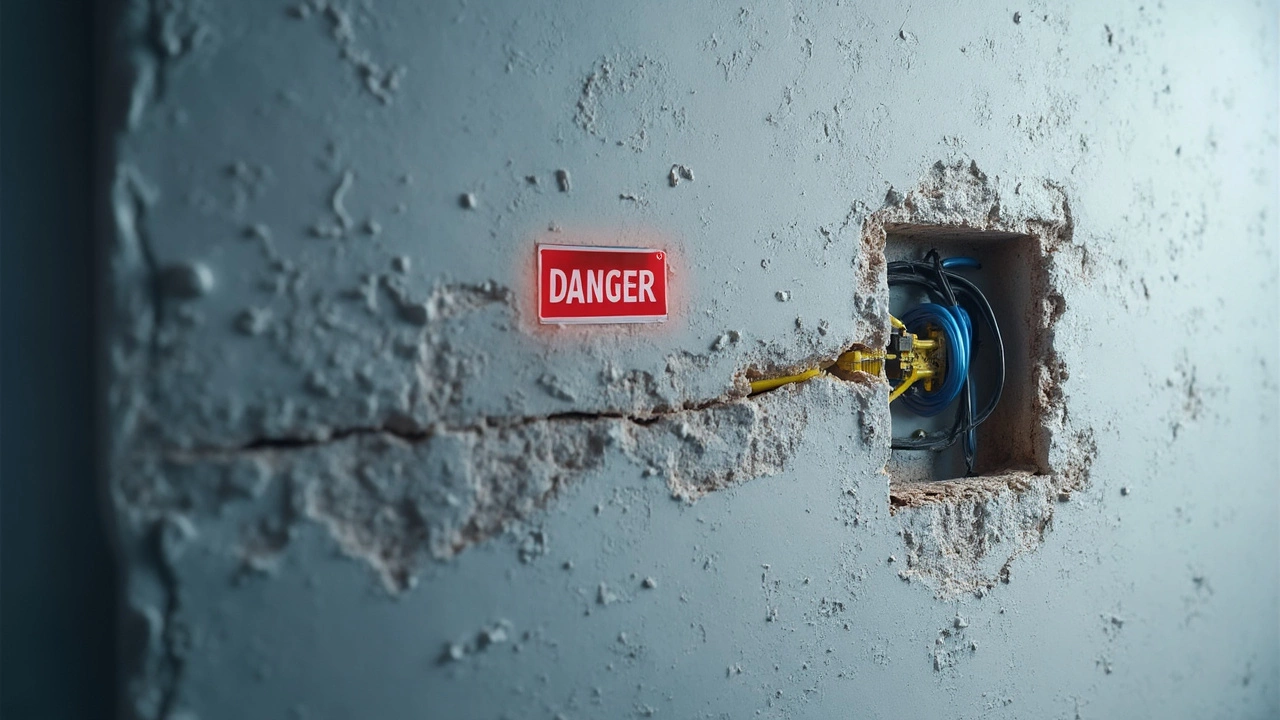
Why Drilling Into New Build Walls Is Tricky (and What Could Go Wrong)
So, what’s at stake if you just grab any drill and go to town? For starters, you risk hitting electrical wires. Shocking fact: the ESA (Electrical Safety Authority) reports that accidental wire punctures are one of the top ten reasons for home electrical fires in Alberta each year. Strike a water pipe, and you’ll quickly see why homeowners insurance premiums keep climbing. Leaks may not show up for weeks, and the damage can run into the thousands. Cracking the drywall is another common pain point. Newer drywall mud (joint compound) dries harder but can still flake, especially if it’s recently painted or not fully cured—common in freshly finished new builds.
If you’re installing heavy items like a TV mount or heavy shelving, sinking an anchor into just the drywall isn’t enough. Drywall can support a few kilograms, but anything heavier will rip anchors right out, leaving a gaping hole you’ll need to repair. Canadian home insurance providers often deny claims for DIY damage due to improper mounting or drilling, so be careful what you stake on your handiwork.
Another curveball: new walls may still be drying. Freshly built houses often have lingering construction moisture. The Canadian Home Builders’ Association found in a 2020 study that internal humidity in new homes averages 10% higher than established builds for the first twelve months. This means the drywall and wood studs might not be at full strength yet. Drilling into a “wet” wall can create slightly bigger, weaker holes, which then close up as the house continues to dry—sometimes pulling screws or anchors loose.
| Material | Drill Bit Needed | Common Risks |
|---|---|---|
| Drywall on wood studs | Standard wood bits | Wires, pipes, cracking |
| Drywall on steel studs | Self-tapping metal bits | Bit slippage, wires |
| Concrete | Masonry bits | Bit damage, dust |
Prepping to Drill: Smart Checks Before You Hit the Trigger
Here’s where good habits pay off. Before drilling anything, slow down for some detective work. First, grab a modern stud finder—they’re lightyears ahead of the old magnetic models. Look for one that detects electrical wires and has a deep scan mode to see through thicker drywall. I use a Franklin ProSensor, but Zircon and Bosch also have top-rated models. What you want is to scan vertically and horizontally at your planned spot. Mark where you find studs and wires with painter’s tape (so you don’t leave a mark).
Water pipes can be trickier. Most Canadian homes run them vertically from floor to fixture, so stay clear of directly beneath sinks, toilets, or radiators. Yet, the trend toward tankless heaters and water recirculation lines means more pipes in unexpected places, so check blueprints if you have them. Don’t have blueprints? Some homebuilders now include wall sensor scans or digital plans with the sale—worth asking your sales agent.
Next, inspect for any wall imperfections. Tap gently with your knuckle—the sound will be noticeably “hollow” over drywall and “solid” over studs or pipes. If an area feels soft or gives, there could be unfinished joint compound underneath, and you should avoid that spot or allow more drying time. If you notice lines of fastener pops (where drywall screws slightly show through the paint), it’s a sign the studs may not be as tight to the drywall—anchors may not hold as strongly there.
- Don’t drill above or below switches and outlets. These areas often have wires running vertically inside the wall.
- If you’re drilling outside walls in winter, know that vapor barriers can be damaged, reducing your insulation value and raising heating bills.
- For heavy objects, measure carefully to ensure you’re anchoring into the center of a stud. Standard studs in Canadian homes are set 16" apart (on center).
- If using toggle or molly bolts, check the wall depth to make sure they’ll expand fully—and won’t bottom out on insulation.
Drilling Safely: The Techniques, Tools, and Tips That Make All the Difference
For most home jobs, a medium-power drill (corded or 18-20V cordless) will do. Use sharp, appropriate bits. A dull wood bit can chew up drywall and make ragged holes. Have a vacuum handy for controlling dust—it’s surprisingly gritty, especially in newer drywall blends. If you’re not sure of your first attempt, start with a small pilot hole. This also lets you check for unexpected obstructions (if you hit metal or something springy, stop).
If you’re hanging something light—a picture frame, for example—drywall anchors are fine. For mid-weight stuff (like curtain rods or towel bars), aim for a stud whenever possible. Use screws at least 1.5” long to ensure a solid hold. For heavy objects (TV brackets, cabinets), never trust drywall alone. Use lag bolts into wood studs or specialty anchors made for steel studs. If you only have drywall, use a toggle anchor rated for more weight than you expect to need. Pro tip: finish each hole with a gentle countersink (just widening the mouth of the hole) to avoid flaring or paper tears on the drywall surface.
- Wear protective glasses. Even a quick job can send sharp dust or fragments flying.
- If you hit something unexpected (metal, plastic, or unusual resistance), stop immediately and reassess—don’t force it.
- Wrap tape around your drill bit at the depth you want to stop—prevents drilling too far into unpredictable stuff behind the wall.
- Always start slow and build up speed. High revs at first will just blow out the hole and eat the finish off your new place.
- Wipe off dust right away—it can stick to new paint and show up under light forever.
Also, consider that even with a perfect mount, fluctuating humidity and temperature in the first year can loosen screws. Check mounts seasonally (especially if you’ve hung something heavy) to catch any early movement before it turns into real damage.

When Not to Drill (and What to Try Instead)
There are times when drilling just isn’t worth the risk. If you’re a renter or have a strict new home warranty, you might lose your deposit or protection by putting holes in the walls. Some warranties are explicit: even a tiny hole is “modification” that voids coverage for paint, drywall, or water leaks. Always double-check your builder’s rulebook before you start poking holes. If you have radiant heat or in-wall speaker wiring—both getting popular in contemporary new builds—absolutely avoid drilling except on well-mapped, safe walls.
If you’re worried, consider alternatives. Peel-and-stick picture strips, removable hooks, and pressurized tension rods all outperform what was out there just a decade ago. For shelving, look at floor-standing units or freestanding bookcases. Want a wall-mounted TV without drills? There are furniture-grade TV stands that mimic the look but don’t mark the wall. Command strips (if you use four or more for a bigger frame) can hold up to 7.2kg (16 pounds) according to manufacturer testing, perfect for most photo walls.
Got something heavier? Maybe check if your builder is willing to come install it (keeping your warranty safe) or ask a certified handyman who knows the quirks of new homes in your area. There’s no shame in letting a pro handle a job if it means no headaches down the road. Plus, sometimes the install fees are way cheaper than fixing a burst pipe or electrical damage from one stray drill.